

How to create Business Manager and why?
Business Manager is a Facebook tool that makes it easier for advertisers and businesses to work with pages and advertising accounts for businesses and smaller advertisers. Thanks to this, you won’t be bothered by how to add more administrators to your sites, ad accounts, or to other assets on Facebook, and you’ll have everything under your control in one single platform.
However, firstly we have to clarify a few things:
- Yes, Business Manager is for free.
- Yes, you need to have your personal profile on Facebook to set up and manage your Business Manager.
- No, without Business Manager, you won’t be working well with your Facebook ad.
Do you agree? Yes? Nice, we can go further. So what are the greatest benefits of having a Business Manager? Find some of them below:
- If you have more pages and accounts, then we can hardly imagine managing all of them without Business Manager.
- When you need to assign more people to one ad account.
- Managing your co-workers is simple and intuitive. Everything goes through their private profiles, but private information from those profiles about you won’t be seen by anyone.
- You cannot create Dynamic Ads without Business Manager… well, and without them, it doesn’t make any sense at all, does it?
- If you work with us, we won’t move forward without it. We do our job as best as we can, and it’s definitely not possible without Business Manager.
So let’s go straight to its creation
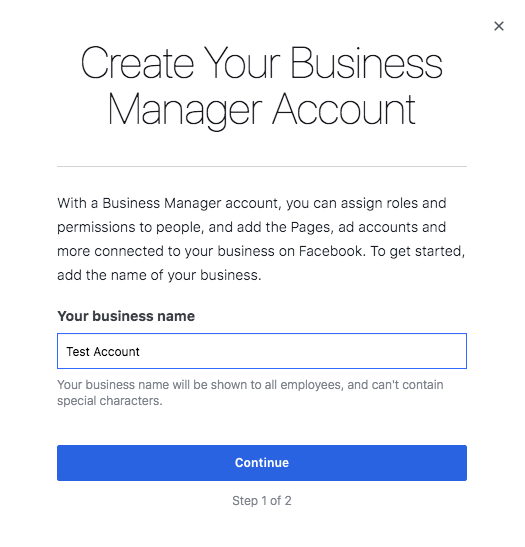
Sign in to your personal Facebook account and go to business.facebook.com.
At the top right, click on “Create Account”, the following window will pop up and you will enter your Business Manager name.
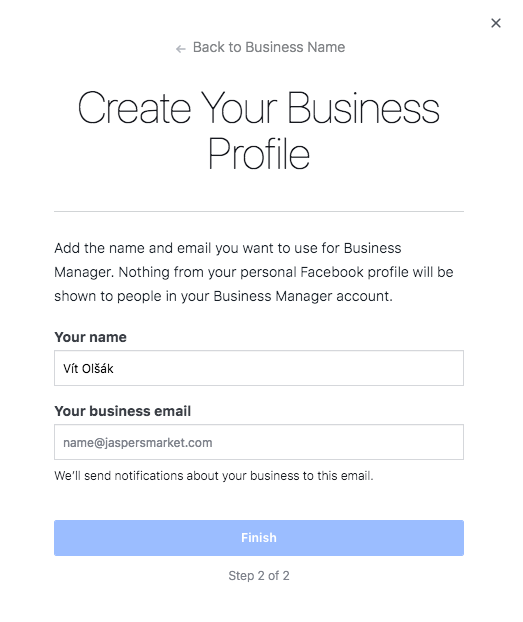
In the next step, fill in your name and e-mail to which all the information from this Business Manager will be sent (remember, however, that you will sign in through your personal Facebook profile).
Congrats, you have now set up a Business Manager account, and you’ll probably see something like the page below.
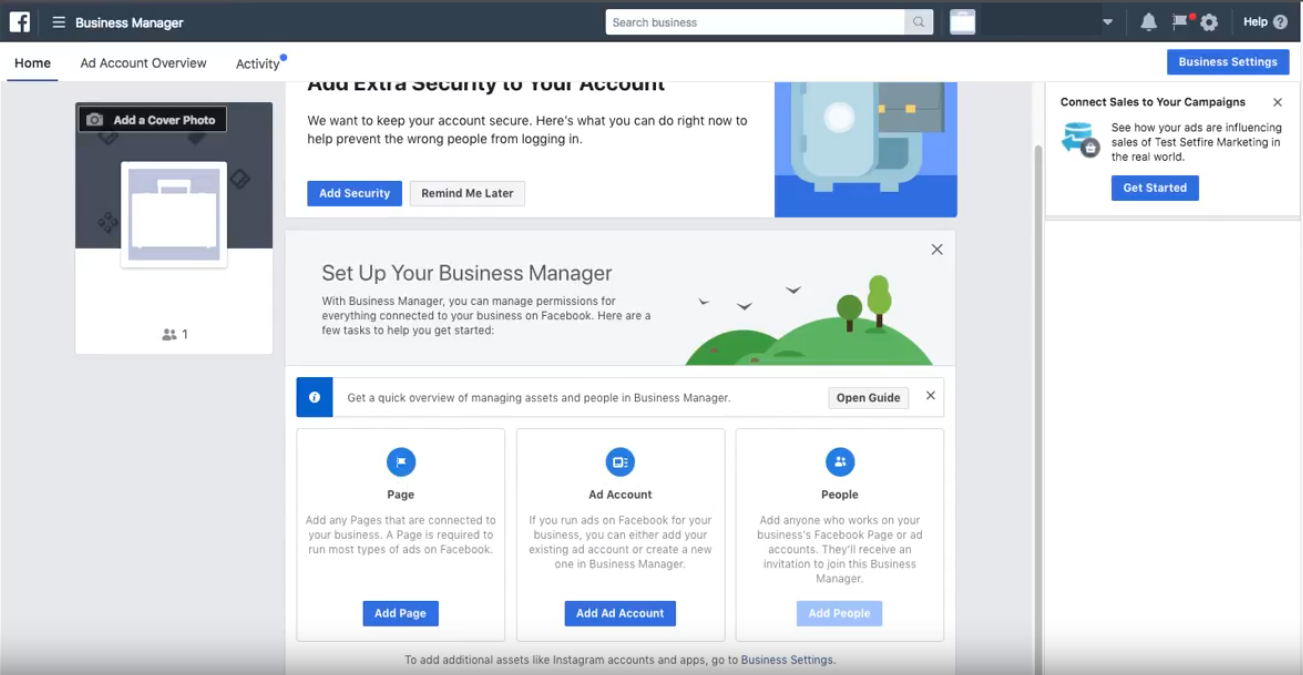
Now it’s time to dive into it or create your Pages, Ad Accounts, and invite your colleagues or advertising agencies to work together. You can do it right through the three links on the main page you see in the picture above. But, these links will disappear after some time, so we’ll show you a more complicated but usual way of how to do it.
Click on the “Business Manager” menu button at the top left, and you will see the entire Business Manager menu that will be the main point of orientation for you. It looks like this:
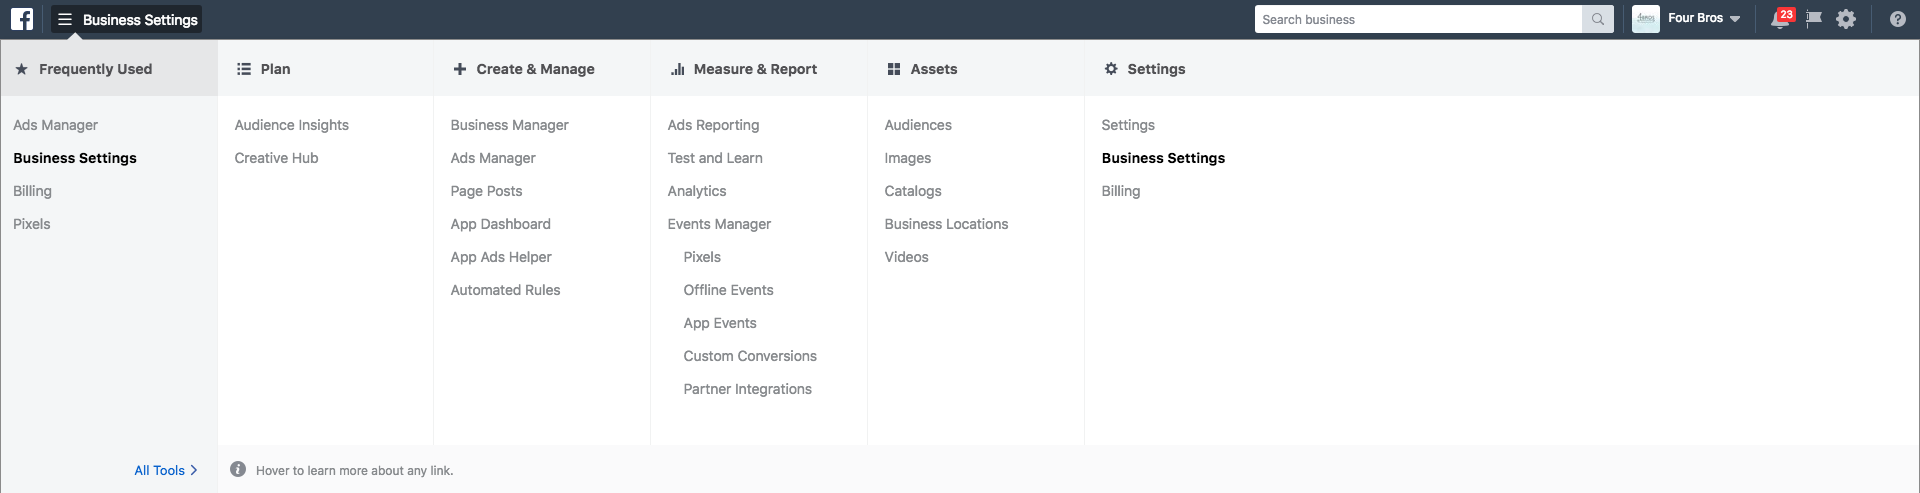
The next step will lead you to “Settings” and “Store Settings” – this is the setting of Business Manager itself, the menu on the left includes management of users, pages, advertising accounts and much more.
Pages in Business Manager
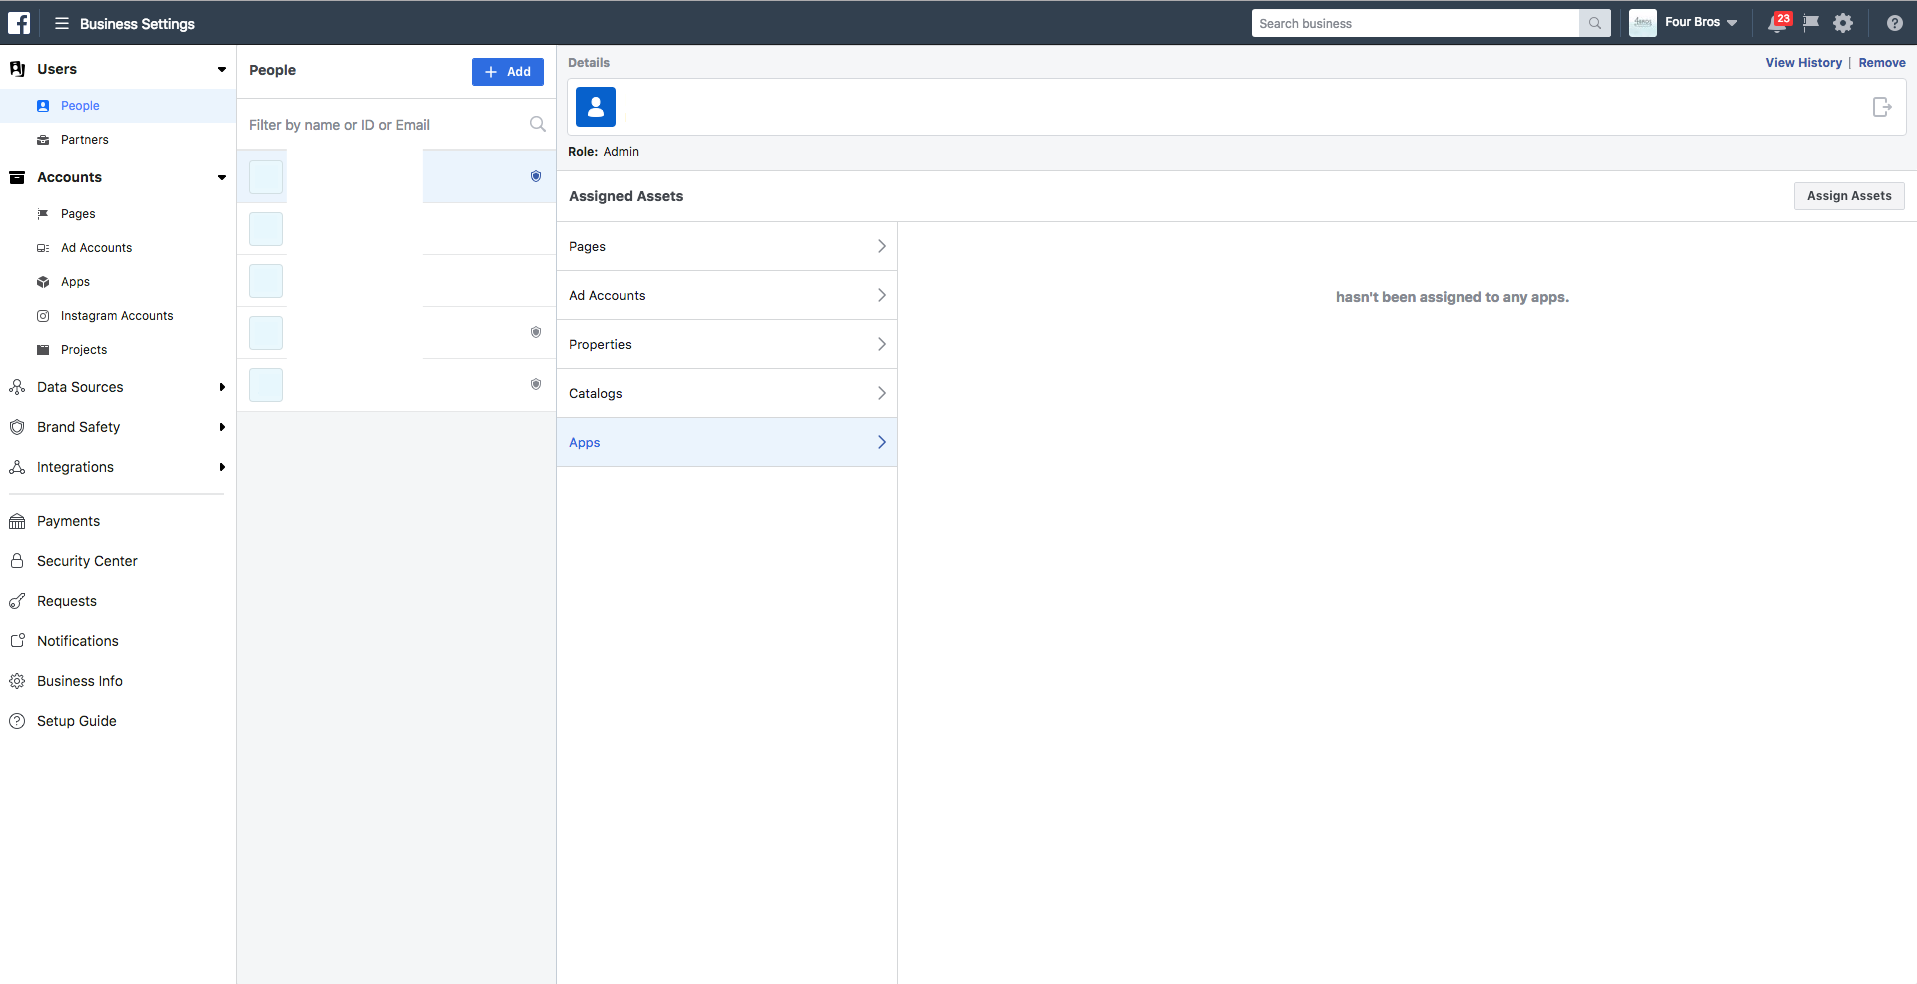
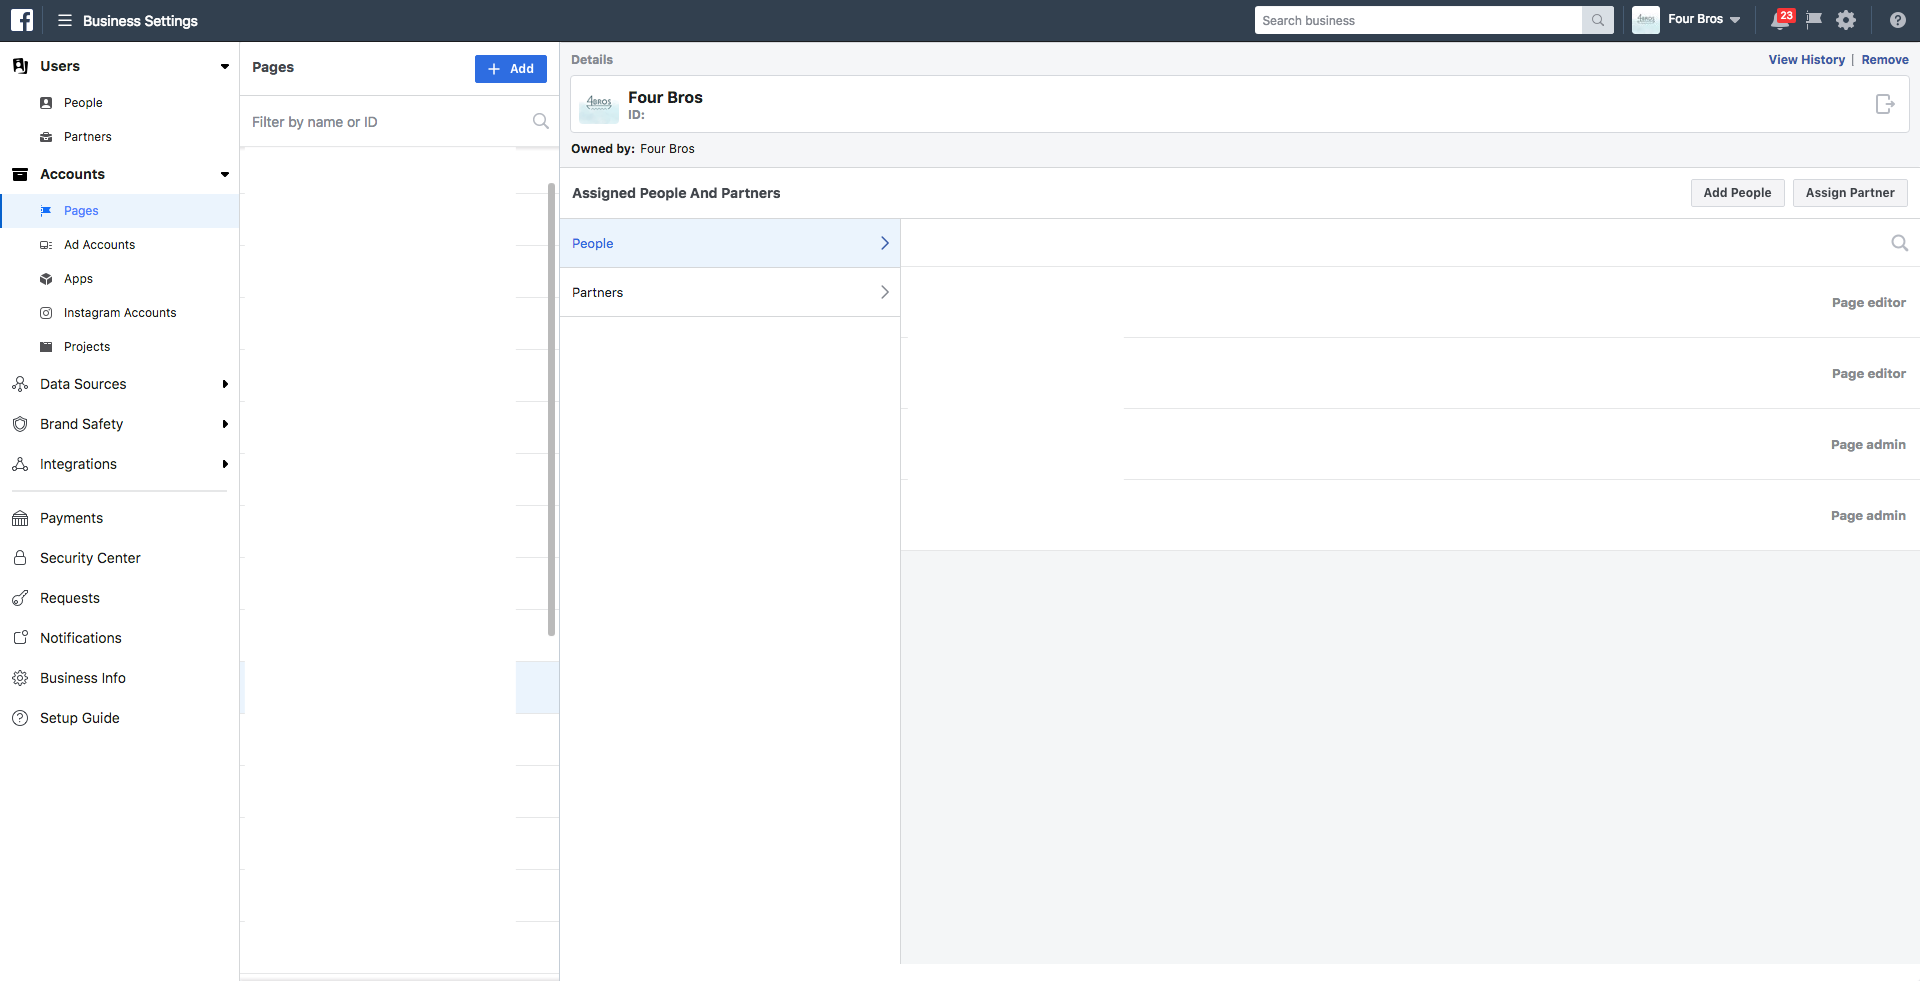
How do you add your already created Page to your Business Manager? In the left Business Settings menu, click on “Pages” to see the following page. In the first column, there is a list of all Pages you are authorized to, on the right-hand side, there are all details of the Page you chose on the left side, specifically people and partners who have access to it through your Business Manager.
Since you have just established Business Manager, you have to add your Page there. To do this, use the blue “+ Add” button above the list of Pages. After clicking, this action will take you here:
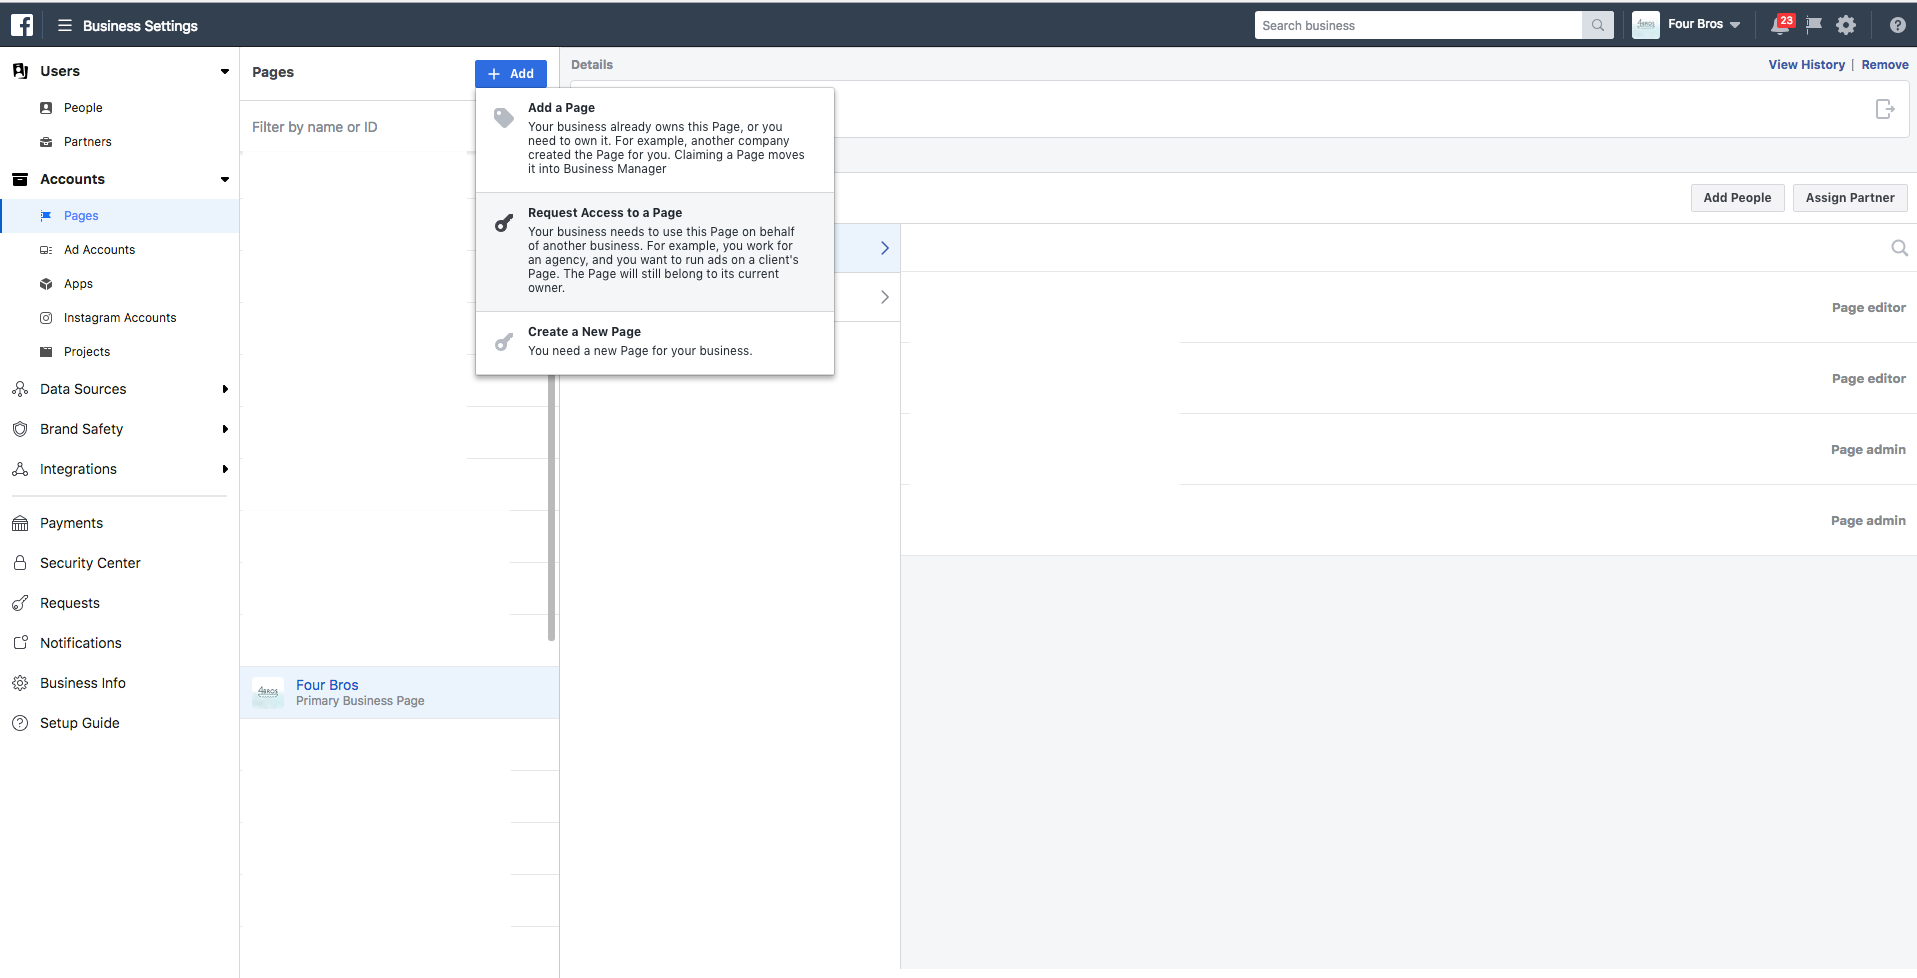
- Add a Page – used to add the Pages you own or Pages that you want to own directly. For example, your company, your products or services.
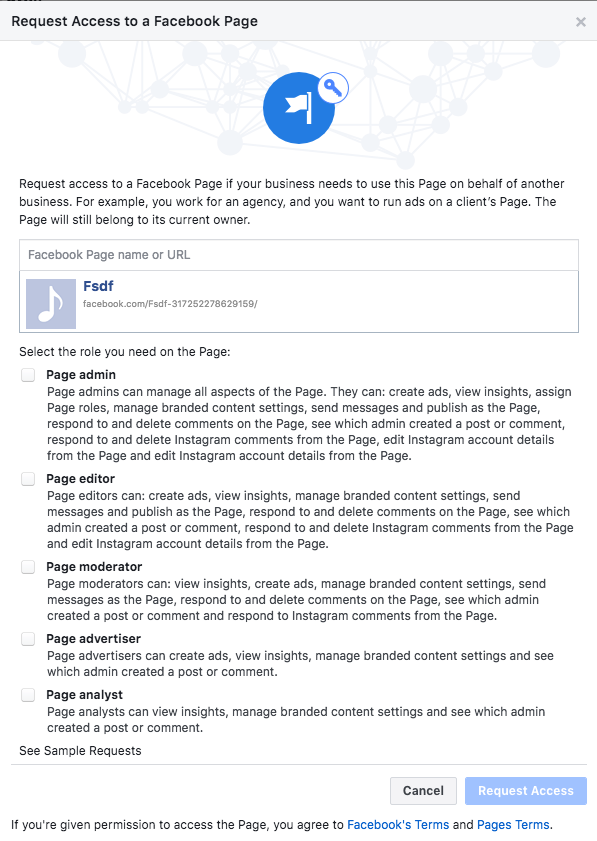
- Request Access to a Page – used to request access to the Page you want to manage or use for creating ads, but you don’t need to own it.
- Create a New Page – used for creation of a new Page.
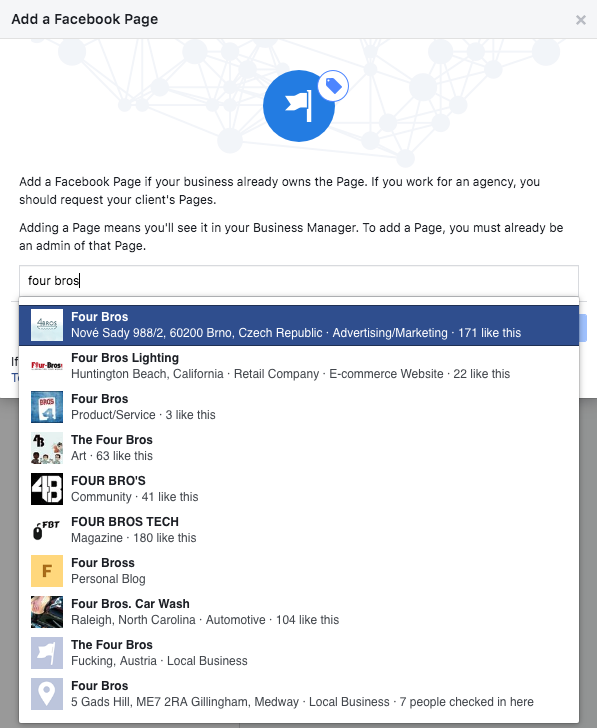
Both Add A Page and Request Access to a Page will pop up in a window where you enter a URL or a page name, and the window will start offering names to you as you write. When you use Add a Page, you can just click on the button and if you are an admin, the page is automatically assigned to your Business Manager. If you don’t have admins rights, the request is automatically sent to the current admin.
Request to a Page will take you to the level of permission that you require for the page. Select the corresponding one and complete the request.
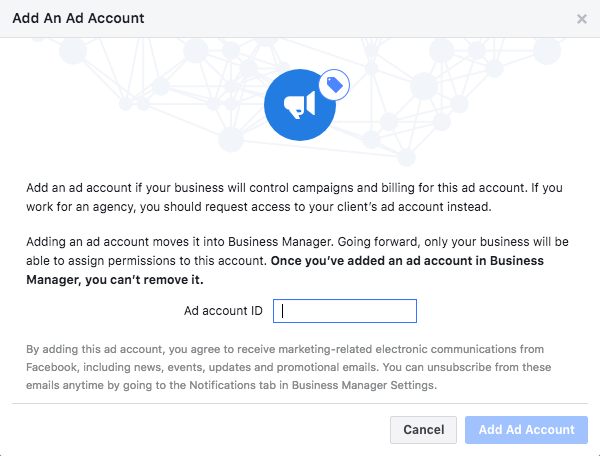
Add Accounts in Business Manager
The same procedure follows when adding or requesting access to your Ad Accounts, except for the fact that, unlike your name or URL, you must enter your Ad Account ID:
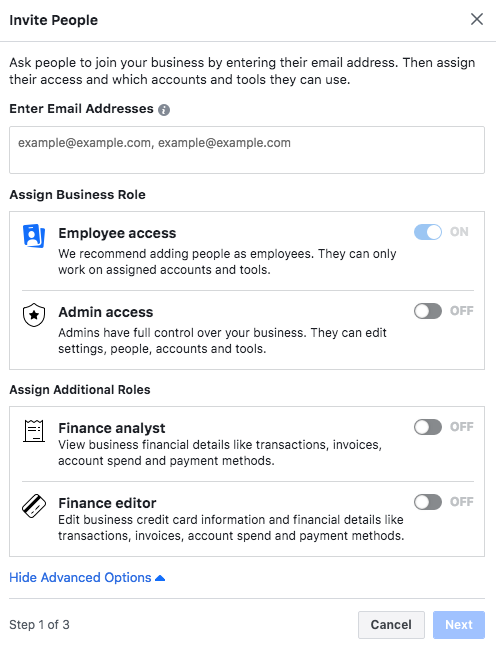
Adding people in Business Manager
How to cooperate with an agency?
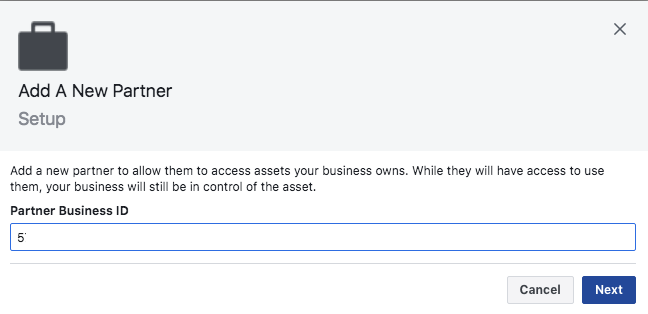
The easiest way to assign Pages, Ad Accounts and more to your agency is through the “Partners” tab. You can find it in the left column at the top under the “People” tab.
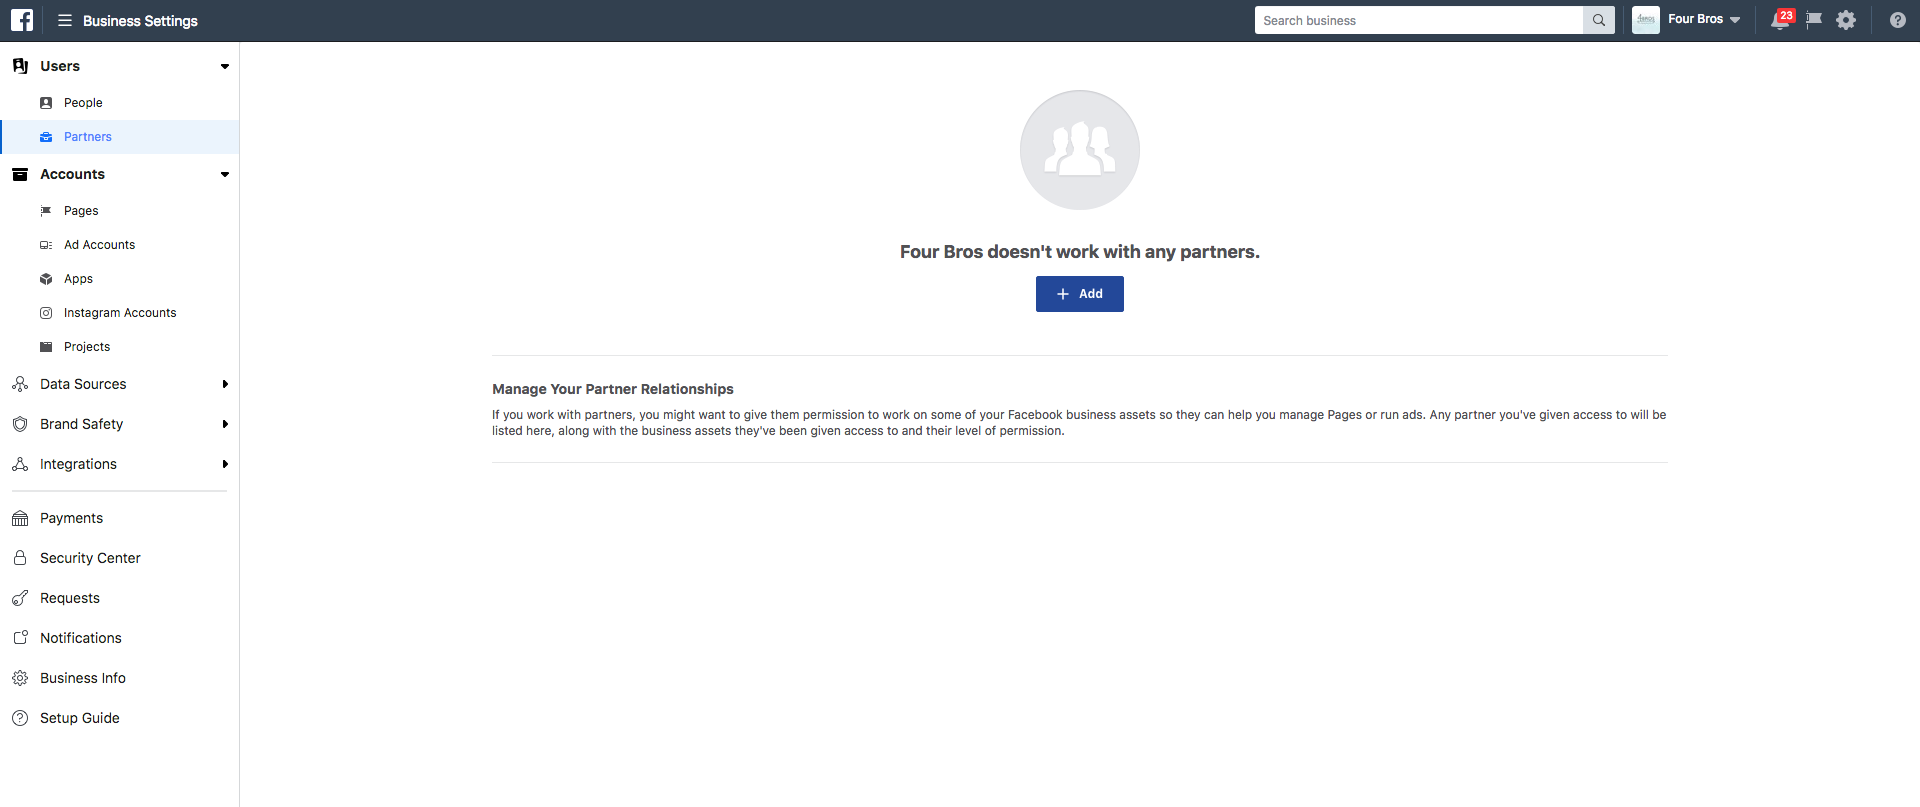
This method offers the easiest addition of any item in several steps. You don’t have to add a page, an ad account, and more sequentially in special steps, which will save you a lot of time, name copying, business ID and contact search. Click “+ Add” and enter the Business ID provided by the agency in the free field.
In the next window, you see a list of all the items that exist in the Facebook environment on the left, and in the right section, you see the specific items you have in your Business Manager. Once the item has been chosen, you can select the permission level in the right-hand menu (more about permission levels below). After you “check” everything you need, simply click on “Assign Assets” and it’s done!

We hope the tutorial will help you, and we wish you a lot of advertising successes that we will be happy to assist you with.